Use the patient timeline
When you open a study, a timeline with additional studies and reports for the patient is shown at the top of the image viewing area.

Note
The timeline is only shown if enabled by the system administrator.
The following information is shown on the timeline:
- Prior studies and DICOM embedded PDF reports are shown in chronological order.
- Anchor indicating this is the current study.
- If the Auto-load and visually merge with the same Accession Number option is active, a plus sign next to the number
 indicates that the studies are displayed merged.
 - Exclamation mark to identify if a warning exists for a study or report.
- Number of studies including the modality.
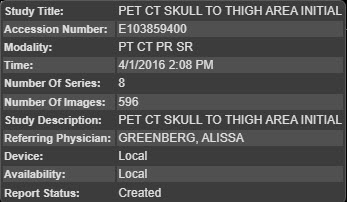
- Date of the report
- Accession number
- Study description
View study or report details
Hover over a study or report in the timeline to view more detailed information.
If the Auto-load and visually merge with the same Accession Number option is active, the tooltip displays all studies with the same accession number in chronological order.

View a study
Select a study in the timeline to load it in all viewports.
or
Drag a study from the timeline to a viewport. This allows you to place different studies in different viewports. A warning appears near the top of the image viewing area stating that multiple studies are displayed.
View a report
Select a report in the timeline. The report opens below the timeline. The following options are available when viewing reports:
- Save Save a PDF copy of the report.
- Print Report Print the report from your browser.
- Vert/Horiz Place the report area on the right side (Vert) or bottom (Horiz) of the screen.
- Maximize/Restore View the report area only and hide the image viewing area (Maximize) or view both the report area and the image viewing area (Restore).
- Close Close the report.
Note
To resize the image viewing and report areas, drag the divider between the two areas.
Select priors to include in the timeline
You can select the priors to include in the timeline.
- Select the Filter icon located at the right side of the timeline. The number under the icon indicates how many studies are displayed in the timeline (for example, All or 2/3).

The Extended Patient Timeline dialog box is displayed.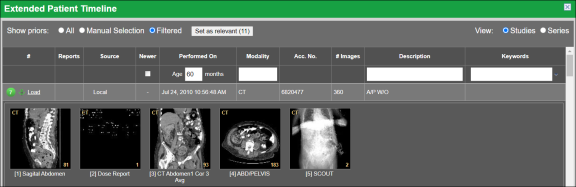
- Select Set as relevant. The selected prior studies are shown in the timeline.
- To filter the available priors, select one of the following options beside Show priors:
All. Include all priors.
Manual Selection. Select the check box for the prior to include.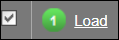
Filtered. Enter search information in the blank row below the column headings. You can select priors based on Age, Modality, Description and Keywords. - To load a prior in the image viewer, select the prior study, then select Load link.

Retrieve prior studies
Use the prior icon in the timeline to trigger a background retrieve of prior studies while reading the current (anchor) study. This behavior is only available for priors located on dicom devices using a ‘cache’ retrieve mode.
Filter the timeline using one-click
When viewing a patient's timeline, you can filter the studies according to keyword(s) associated with that study.
In order to see keywords, you must have the following options enabled:
-
Enable study keyword tagging enabled through Settings | System | Timeline (option available to system administrators only).
-
Matching Hanging Protocols Templates configured through Settings | Hanging Protocols | Rules Templates.
To filter the timeline using one or more keywords:
- At the far right of the timeline, select the checkbox(es) for the applicable keyword(s). The number in parentheses indicates the number of studies shown, All matching studies are displayed in the timeline.
If no keywords have been associated with a study, the text "no keywords found" is displayed inside of the keyword list. -
To see what keywords are associated with a particular study, hover over the study to display the keyword information.
- To update the timeline and remove any previously selected keywords, select the checkbox for the applicable keyword(s).
Note
It is possible to filter the timeline entries only by keywords, ignoring any other existing timeline filters. This option is available by enabling the Available Keyword Matching Only option through Settings | User Preferences | Patient History.
Filter the timeline using Plus One (+1)
The Plus One (+1) feature expands the studies in the timeline based upon the adjacent keyword relationship as defined in the Rules Templates. This allows you to append the current study type with other relevant studies, allowing for easier and quicker viewing of related material.
Example scenario
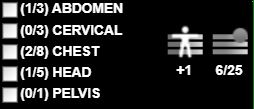
- The Rules templates for ABDOMEN includes the adjacent templates PELVIS, LUMBAR and CHEST (as these are body parts adjacent to the ABDOMEN).

- On the timeline, the ABDOMEN keyword is selected, and the timeline looks like this:

- When the +1 icon is selected, the keyword(s) defined as adjacent to the ABDOMEN in the Rules templates are automatically selected; for example, CHEST and PELVIS. The timeline is updated and shows all the relevant studies by date.

- If you continue to click the +1 icon, more adjacent keywords are selected, and more studies are shown based. For example: The ABDOMAN, CHEST and PELVIS keywords are selected. When you select +1 icon, the adjacent keywords for CHEST - CERVICAL and HEAD - are selected, and the timeline is appended with the relevant studies.
- If all keywords are selected and you select the +1 icon, all the keyword selections are cleared.
Timeline display options
The timeline display can be changed in several ways:
-
Hovering over the image area to bring the timeline to the foreground.
-
Using the collapse/expand arrow widget to hide the timeline.
-
Changing the Workstation Preferences | Image viewer controls | Always show timeline to Yes so that the timeline displays a separate area, and not overlapping the image.
